Friday, November 18, 2022

Welcome the Tempest Weather Station

 Prime day

The most feared day of the year for my wife is Amazon Prime day, and last prime day was like none other. We (well I) ordered lots of very useful stuff and spend WAY too much time looking at lightning deals. With the current state of my weather station (mostly dead) I ran across a lighting deal for a WeatherFlow Tempest weather station. A small self contained external unit for $60 off, interesting. 

Tempest

I looked into it quickly (it is a lightning deal after all) and found the Tempest had the major requirements covered: Temperature, wind direction, Humidity, solar powered, wireless, Rain sensor. So far so good, but I want to integrate this with my Home Assistant and some other side projects, so I need the data. Well the Tempest has integrations out of the box, including: WeatherUnderground, IFTTT, Google, Alexa, Seri, SmartThings (Late 2022), to name only a few! But having an integration does not mean I can get to the data myself, does it? 

Data

Welcome the Weatherflow Tempest API & Developer platform. The API offers full REST and Websocket documentation that can all be accessed once you create an access token. Although the documentation recommends using the API, the Tempest does have a local UDP interface to your local network. 

Integrations 

The end goals are to integrate this into my Home Assistant house automation and to be able to have some remote weather displays. I am going to be looking into weatherflow2mqtt for interfacing with Home Assistant. I am going to be looking at using a Raspberry Pico to interface an LED Matrix for displaying weather information in the house. But those are for next time. 

Monday, November 7, 2022

Part 3 - The end of DIY weather stations

A Weather Station Postmortem 

In Part 1 I built a weather shield out of bowls and Part 2 filled it with all sorts of gadgets, powered it using a battery and a charged the battery using a solar panel. The station was remotely deployed in the back yard to avoid interference from blacktop and other structures. 

Deployed


Deployed in 2017 the DIY weather station was solid for several years. It ran and logged data without any intervention. The battery never died and the solar charging worked flawlessly. The logging via the MQTT server and the integration into home assistant was fairly easy and provided years of data (that I have since lost while upgrading Home Assistant). 


Issues

After 3 years things started to get glitchy, I would have to restart the Arduino by taking it apart and disconnecting the battery and solar connector. This would work and it would run for a few more weeks. Not sure if this was related to the solar panel which after a few years I had to start cleaning to remove the film left over the years. 

Another issue was that the bowls used where very thin and cheap and have become very brittle; one stray baseball or soccer kick and you ended up looking like this. 

End Result

It was a great project and lasted much longer given the less than great weather proofing I provided. In retrospect I should have used some higher quality bowls combined with some good silicone to plug the holes. I also would have added a power switch to the outside of the case and hooked up a small USB cable and left it in place to allow debugging without completely disassembling the unit.

Overall, for a first project of this scale, I think it was a great learning experience. 


Sunday, November 6, 2022

Part 2 - DIY Home built weather station

 Part 2 - DIY Home built weather station

In 
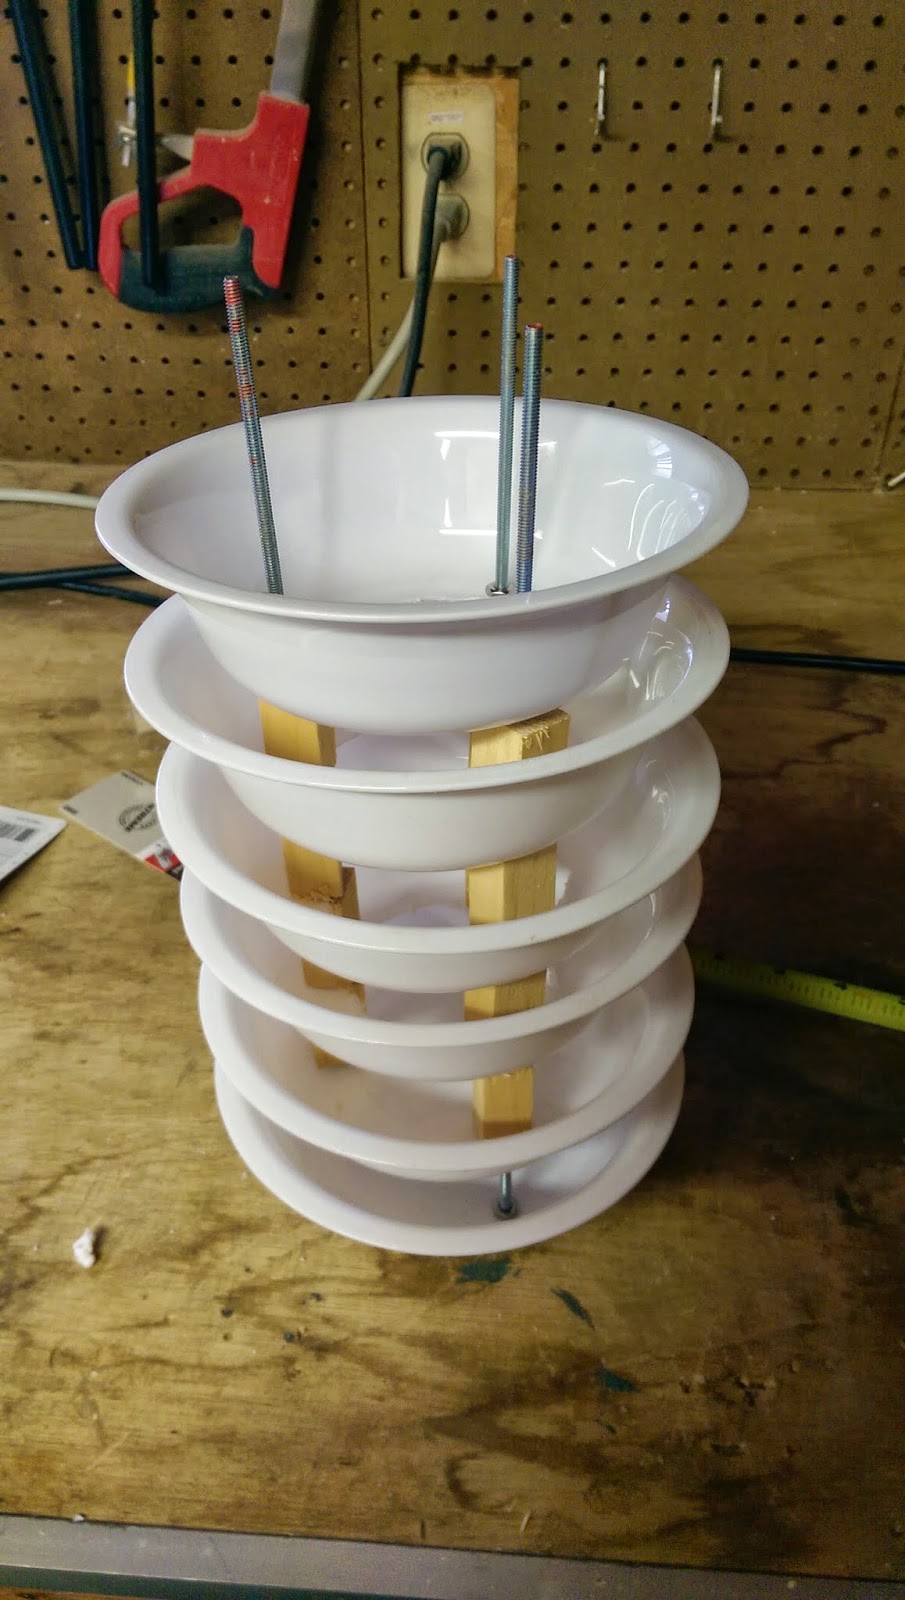
Part 1 I built a radiant heat shield out of plastic bowels. I shared the design but never did the follow up showing the final product (better late than never)?

For this post I will detail the design to it with all sorts of gadgets and powered it using a battery and a charged the battery using a solar panel. The station was remotely deployed in the back yard to avoid interference from blacktop and other structures.  It sent its data using a nRF24l01 transmitter to a Raspberry pi running another nRF24 transmitter. I never really went into the details, so here are what I deployed 8 years ago.  (Yes, there is much better hardware options available now!)

Weather Instruments

I wanted to collect remote temperatures that are not affected by the driveway, so I started with the DHT11, then moved to a DHT22 during testing. While browsing I found an AHT20, which is an outdoor version of the DHT22. This fits perfectly since it is already wired and can just hang inside the shield. To collect barometric pressure, I added the BMP085, which also includes a temperature sensor which can be used to keep the DHT22 in check. To keep track of sunlight I added a simple Photocell to track sunlight brightness.  

Power & Charging


To power the Arduino I added the Adafruit USB / DC / Solar Lithium Ion/Polymer charger - v2 with a 1200mAh Lithium ion battery. Since the weather station would be outside in NJ and be subjected to occasional cold days I added a 10K Thermistor that would stop charging the battery when the temperatures are hot (50°C) or cold (0°C). This was powered during the day via a 165mm x 165mm 6v Solar panel mounted above the station. 


Guts

Once all the instruments and power was setup I used an Arduino 3.3V Pro Micro to read the instruments. This would run and gather the results and transmit via a nRF24l01 transmitter to a Raspberry Pi which collected the results and posted them to a mosquito MQTT broker which displayed them on a Home Assistant (all outside the scope of this article). 


Data

The data transmitted include the temperature from the DHT22 as well as from the BMP180. The humidity was also captured via the DHT22 which was then used to calculate the dewpoint. The photocell calculated the light level.  Some additional metadata was included for tracking system performance including the voltage of the battery, if the battery was currently charging or done charging, 

Packaging


To deploy I soldered the Arduino to a small double sided PCB board that would fit into a small metal Sucrets tin (this was before I owned a 3d printer). I cut holes in the tin to be able to hook a USB cable into the Arduino and update code (in retrospect I wish I would have left the cable attached). I also had to fish the wires out and leave a connection to the solar panel. In the end everything fit snug. 


Code

Since this was running on a battery and on a solar panel I wanted to take advantage of the LowPower module to put it to sleep since I only need to read the temperatures every few min. I also take and grab the temperatures into an array and only send the average every min. The code also includes a simple python version for the Raspberry pi to read the data and decode the RF stream and print the struct out. 

The code is located here on github.

Finished Project


Parts list:


Friday, July 4, 2014

Part 1 - Building a Solar Radiation Shield

Part 1 - Solar Radiation Shield

After doing some research on underground weather I found that it is recommended to use a radiation shield. So doing some searches I found that they are pretty darn expensive, translation to my wife, you want to spend HOW much on a hunk of metal (cheapest I found was $50 plus shipping)?

So I asked myself, why do I need a radiation shield? I found some interesting information here, which comes out with the takeaway that with no breeze the temperature can be up to a degree(s) higher than when in a radiation shield. 

However there must be a cheaper way.. insert the DIY approach! Go to the local dollar store and purchase about 6 plastic bowels. Stop at Home Depot and purchase three 1/8 inch diameter,  12 inch long rods and a box of stainless nuts. and a bunch of wood dowels to space the bowls apart.

Tape the bowls together so you can drill three holes in the same place in all the bowls. Using a drill press or a drill drill holes and then remove the tape.
Next you need to take all but 2 or 3 bowls and cut the middle of the bowl out so we have a large center chamber to put the temperature sensor. 

Take the rods and place double nuts at an even distance from the top of the rod and this will hold your top cover in place. I used stainless wing nuts on the top to make access to my electronic components easier in the future.

Lastly we take and cut the hunks of wood into small spacers, then drill the center of the spacers out. Placing everything on top of each other will make a cheap DIY radiation shield.


Next in Part 2 - Prototyping the Arduino remote temperature sensor

Thursday, June 19, 2014

AHBWS - Another Home Brew Weather Station

After years of taking classes at NJIT I have completed my Masters in Computer Science I have to figure out how to fill my time. I have decided to dive head first into the wonderful world of arduino!

While playing with random components is fun I like to have a larger goal in mind and so I have decided to create a weather station. So I started by doing the research of how to publish my data on the weather underground and found they have two recommendations that are going to drive my design. First the thermometer is 50' from the nearest paved surface. I was initially thinking of mounting the weather unit on the back of the garage, but that wont be 50' from the driveway.  Second is that the thermometer is recommended to be placed into a radiation shield.


Ambient Weather SRS100 Solar Radiation Shield

Basic design will be to take a Sparkfun SEN-08942 Weather Meter hooked to an arduino uno with a RF24+ talking to a remote mounted arduino mini-pro reading temperature / humidity & atmospheric pressure and transmitting the data back to the uno.

Parts and more details will be coming in following posts.

Monday, February 21, 2011

Full Calendar 1-4.10

After a year of not playing with FullCalendar it was brought to my attention that my examples no longer work with version 1-4.10 of  FullCalendar. So I took my sample code and modified it to work with the latest version of FullCalendar and ASP.NET (VB).  The problems are still the same, just in different places.

You need to still modify the start / end param names (now  called startParam and endParam) to use another date name, I prefer startDate and endDate.  If you open the fullcalendar.js file you will find these around line 43.


//startParam: 'start',
//endParam: 'end',
startParam: 'startDate',
endParam: 'endDate' 

Next you need to a search for .ajax (or skip to line 923) and modify the lines to add a couple key points to make this work with an ASP webservice.

 $.ajax({
url: source,
type: 'POST',
dataType: 'json',
contentType: 'application/json; charset=utf-8',
data: JSON.stringify(params),
cache: options.cacheParam 
false, // don't let jquery prevent caching if cacheParam is being used
success: function(events) {
popLoading();
callback(eval(events.d));
}


The last change was to create your webservice that will post your calendar events from your database to the calendar via the jquery ajax call. 

    <WebMethod()> _
    Public Function EventList(ByVal startDate As String, ByVal endDate As String) As String
        ' List to hold events
        Dim events As List(Of CalendarDTO) = New List(Of CalendarDTO)()

        Dim starting As DateTime = FromUnixTimespan(startDate)
        ' Loop through events to be added
        For i As Integer = 0 To 4
            ' Create a new event and start to populate
            Dim value As CalendarDTO = New CalendarDTO()
            ' Date is required to be in a unix format
            value.StartDate = ToUnixTimespan(starting.AddDays(i * 2))
            value.id = i
            value.title = "Title of event number " + i.ToString()

            If i Mod 2 = 1 Then ' if even we will add an end date
                value.EndDate = ToUnixTimespan(starting.AddDays(1 + (i * 3)))
            End If
            events.Add(value)
        Next
        ' Serialize the return value so it can be decoded in java.
        Dim js As New System.Web.Script.Serialization.JavaScriptSerializer
        Dim returnvalue As String = js.Serialize(events).Replace("StartDate", "start").Replace("EndDate", "end")

        Return ret


As promised here is the full sample code to get fullcalendar working with a ASP webservice.

On a side note.. Have you read the latest Scot Harvath book, its well worth the read!


Enjoy!


Saturday, January 1, 2011

Student Discounts Rock!

If you do any development and happen to be a student you GOTTA check out Microsoft's DreamSpark program! As per the DreamSpark site:
DreamSpark is simple: Its about giving students Microsoft professional tools at no charge. 

Students get full versions of Visual Studio 2010 Pro (Or 2008 Pro), Windows Server 2008 or 2008 R2, Expression Studio 4 ultimate and lots more (Sql Server, Game Studio).  I would say its worth enrolling in a few classes just to get download privileges to this site!